Before you start to work on your design it is important to know how layers work in Adobe Photoshop. If you are already familiar with it, then please skip this page. If not, you might want to read further.
♥ HOW TO ACCESS LAYERS
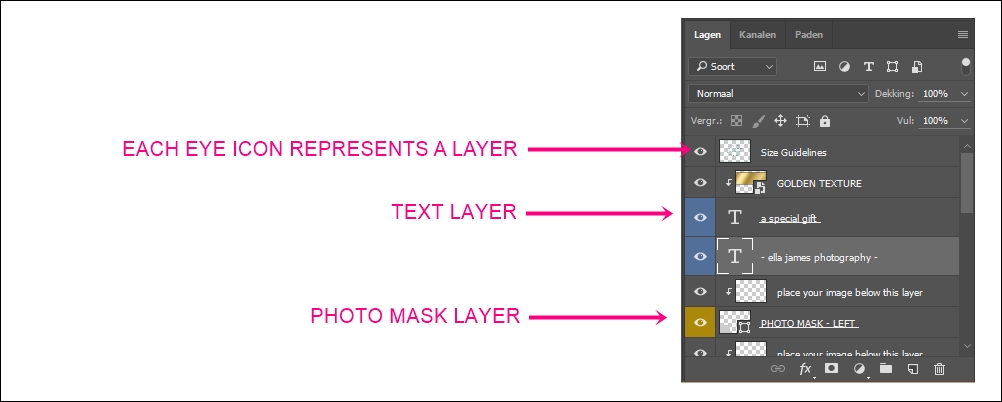
The great thing about Photoshop files is that you can build them up in layers, each layer holding a part of the design. This way people can easily access and change only that part of the design. My designs are build up out of layers of text, layers with illustrations, layers that cause color effects (like a golden texture) and layers that hold photos. Let's see what this looks like in a design:
1. open your .PSD file in Adobe Photoshop - on the lower right side of the screen you will notice the layer section of your file
2. this is what the layer section looks like when you zoom in:
♥ HOW TO EDIT A LAYER
When you want to edit a part of the design, let's say a piece of text, you will need to select the layer that represents that piece of text. => Scroll through the layers till you find the one you want to work on. Click on that layer with the left mouse button. Now that layer is selected and changes can be made to it.
♥ HOW TO DISABLE A LAYER
When you want a particular layer not to show up in your design, whether it is a piece of text, an illustration, a golden texture behind a text or a photo mask, you can easily disable that layer by clicking on the little eye icon in front of the layer. This way you are not fully removing that part of the design, but it will no longer show up when you save it for printing. If you change your mind about it, you can easily turn the layer back on by clicking on the eye icon again.
♥ ABOUT THE SIZE GUIDELINES LAYER IN CARDS
Some of the .PSD files for cards (rack cards, gift cards, business cards, price list cards etc.) will have a size guidelines layer when you open them. This layer is there to show you how much space is needed around the card for clipping and trimming by the printing company. Before you start working on your design, just disable this layer by clicking on the eye icon. After disabling the layer, the lines that indicate the trimming space will still be visible, but the guidance text will be gone. In my later designs I have stopped using these guide lines since people commented that they were confused by the lines. Just make sure not to let your text go all the way to the edges of the template.
♥ LAYERS THAT HAVE BEEN CLUSTERED IN A GROUP
In some designs I needed to create so many layers that I decided to cluster some of them in a group. This way the list of layers is not endless and it will be easier to navigate layers. This is what a group of layers look like:
To access the layers in such a group, just click on the little arrow icon of the group layer. This will open it and will show you the layers inside the group. Now you can edit them individually as described above.


